 Got a minute or 5? Last night I made an emergency lamp out of a breath mint tin, wick, and olive oil… in 4:41 minutes. It will probably take you less time but I’m slow.
I love to re-think and re-purpose common items we usually throw in the landfill. I build my signature “outhouse” birdhouse out of old barn wood and used pallets. I’ll have to post a DIY article on that soon. Back to today’s quick DIY adventure.
An easy project is this oil lamp. You can use any container you like. I chose a breath mint tin since I have a large collection of them from each school year. I always hated teachers bending down at my desk and breathing horrid, putrid breath on me. So I eat lots of mints teaching. I also like the tins with lids so I can throw one in my bag for wilderness trips. Just render some animal fat for fuel and you’ve got a long-lasting source of light. It creates great ambiance after the meat has been cooked over the open fire and the lies around the campfire begin to fly. Whatever!
Here’s how I made mine. You’ll probably make one that beats mine like a drum. Please share if you do.
Materials
Breath mint tin (color to match wife’s decor – I gave her three color choices. I’m nice like that)
Wick – Use only material with natural fibers. Man-made will melt and stink. If you want to get all primitive, you could use cordage you made from natural fibers. I used what I had on hand.
Fuel – I used the last of a bottle of olive oil in the pantry that had gone rancid. As Rachel Ray says, EVO. The benefit of this oil is that its odorless and burns without smoking. Also, if it’s spilled while lit, it won’t cause a flash fire like other lantern fuels.
Tools
Sharp object (I used a utility knife and Swiss Army Knife)
Nail punch (Just because I had mine handy and my wick was about a 1/4 inch in diameter. I guess I could have used the SAK for the whole project.)
Assembly
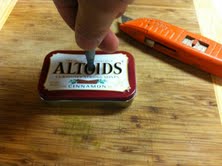
Step 1: Gently make a hole in the lid of the tin with your sharp object. Be careful not to gash a huge hole in the lid or you hand. Don’t press the knife straight into the lid. Use a gentle twisting motion with the point of the knife to start the hole. This allows you to control the size you create. The hole size is determined by the diameter of your wick material. The larger the wick, the larger the flame. I tweaked the hole until the wick fits snugly. In the first photo, I included two other possible wick choices.
Create starter hole…carefully
Step 2: I used a nail punch that is cone-shaped to slowly tweak the starter hole to match my wick’s diameter.
Tweaking the hole for the diameter of my wick
Step 3: Make a small hole to the side of the main hole. This allows for air circulation and venting.
Vent hole
Step 4: Now, insert the wick into the hole with a small amount exposed on the outside of the lid. The remaining wick is curled into the bottom of the tin.
Wick inserted
Step 5: Add your olive oil. Don’t fill the tin to the top. You’ll discover a leak where the lid is connected to the side of the tin.
Fuel up!
Step 6: After adding the fuel, allow the wick a couple of minutes to saturate. Then light your lamp and impress the misses.
Burn baby burn
What do you think? Let me know of anything you’d do different. Ideas?
Source:survivalsherpa.wordpress.com


One Reply to “DIY Preparedness: The 5 Minute Tin Olive Oil Lamp”