You’ve probably noticed how shiny your cucumbers, apples, or other smooth produce looks when you buy it. That’s because it’s coated in a wax.

Though their pretty appearance is one of the benefits of waxing food, the main reason for waxing food is for preservation. Wax is also used for jellies and cheese.
Using Wax to Preserve Fresh Produce
The wax that commercial producers use may contain fungicides, bactericides, growth regulators, anti-sprouting agents, or other preservatives so that the food stays good as long as possible. The wax itself helps hold in moisture and slows oxygen penetration that causes ripening.
Another reason that wax is used on produce is to reduce the use of disposable, non-biodegradable packaging such as sleeves and plastic wrap.
Though waxing fruits and vegetables slows down the ripening process, it doesn’t extend it for long enough to be considered a viable long-term preservation method. There are better ways to preserve your produce long-term.
Using Wax to Preserve Jams and Jellies
For many years, paraffin wax was also used to seal the top of jams and jellies. This was meant to be more of a temporary preservation method of a food that didn’t spoil quickly anyway.
Consider it the precursor to Tupperware – it just formed a physical seal that prevented mold from growing for a couple of months until it was eaten.
The technique for this was fairly simple. You sterilized your jars and lids, and made your jellies just like you do now.
Instead of adding the lid and water-bathing it, though, you would have poured a quarter-inch or so of melted paraffin wax over the hot jelly, then stirred it just a bit to completely cover the top.
The wax is lighter so it stays on top, and as the wax and jelly cools, the wax forms a seal. Then you add your lid.
Since the advent of canning, waxing jelly has pretty much gone by the wayside because canning preserves your spreads for years instead of months.
The acid and sugar in preserves are pretty decent preservatives, anyway – the wax just extended that by keeping water from settling in dips and wells on the surface. That’s what promotes mold growth.
Using Wax to Preserve Cheese
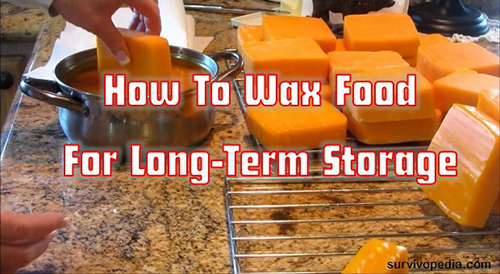
Now, another food that’s still preserved with wax is cheese. You’ve likely bought those little individual bites of cheese that are covered in red wax. You just peel the strip back and the wax opens up like a lid, revealing the cheese inside.
If SHTF, cheese will be a luxury item, so learning to make it and preserve it now is the way to go. Even if you just buy cheese from the store and wax it, it’ll keep in a cool dry place nearly indefinitely.
We all know that everything’s better with cheese on it, and if you have a stockpile of it, you’re going to have a delicious way to keep food interesting. You’ll also have a valuable trade item.
Now, you should know from the outset that the government warns against eating any type of dairy product that hasn’t been refrigerated because of the risk of botulism.
They actually spend millions of dollars a year fighting the bacteria that afflicts 160 or so people a year. Don’t get me wrong – botulism is nasty business. It’s just that I couldn’t find a single case of real cheese-induced botulism.
Wax is great for preserving cheese because it keeps the moisture in and the bacteria and molds out that cause spoilage.
I like the thought of waxing for a couple of reasons – it allows the cheese to age and develop flavor, and it preserves one of my favorite foods in a manner that doesn’t require refrigeration.
What Cheese Can I Wax?
Great question. Because of the high moisture content, soft cheeses aren’t good candidates for waxing. Harder cheeses such as cheddar, Swiss, parmesan, Colby and Gruyere are all good for waxing. If you start checking deeper into the USDA thing, many extensions say that it’s OK to store hard cheeses without refrigeration.
Choose cheeses that have a 40 percent or less moisture content. After all, moisture is a breeding ground for bacteria, and you don’t want your cheese to spoil inside the wax.
Remember that your cheese will continue to age after you age it. I think that’s a good thing, because I like those sharp flavors.
Video first seen on Linda’s Pantry.
What Kind of Wax to Use?
Before you pull out your chunk of paraffin, you need to know that you can’t use it for cheese. It’s not pliable enough and it doesn’t get hot enough to kill bacteria. You need to buy cheese wax specifically. This is easy to find online by running an internet search for cheese wax or cheese making supplies.
Word of caution: wax explodes at high temperatures, so once you heat it to 180 degrees F (the temperature that kills bacteria), turn the heat off. It’s a good idea to use a double broiler, too.
Another benefit of using cheese wax is that you can strain it through cheesecloth to get the cheese off of it and re-use it. Finally, it dries faster than paraffin, which cuts down on your processing time and gives bacteria less time to reach the cheese.
Oh, and don’t forget about gravity – your cheese is likely going to be sitting on a rack so that moisture can’t pool under it, so it’s going to sink a bit. Cheese wax will shift with it, but paraffin won’t.
What do I Need to Wax Cheese?
In order to wax your cheese, you’re going to need three things, at minimum: cheese wax, a cheese wax brush, and a can to melt the wax in. A metal coffee can is great because you can just put the lid on when you’re done and store the wax right in it until you want to wax your next batch of cheese.

The reason that you need a special cheese brush is that regular nylon brushes will melt when you dip it into the wax. That’s never a good thing. So, buy a good brush.
Methods to Wax Cheese
Ahh. Now the rubber’s going to hit the road. There are two different methods that you can use to wax your cheese. You can dip it or you can paint it on. Either way, remember that two thin layers is better than one thick layer, so plan on going over your cheese twice, regardless.
1. Dipping
Dipping your cheese in the wax is a much prettier way to wax your cheese but it has one major downfall: you can only dip cheese chunks as big as your container, and as deep as your wax.
Still, if you’re waxing store-bought cheese in the small bricks, dipping will work just fine. So, let’s get started.
Before you wax your cheese, it’s best to let it rest at cool room temperature for a few days and get a bit of a harder rind on the outside. That also helps it dry out a bit more.
Now that you’re ready to dip, heat your wax up in your can or container until it’s 180 degrees and remove from heat. Have parchment paper ready to put your cheese on after you dip it.
Now, using tongs or your fingers (use tongs!), dip your cheese in the wax as far up as the tongs or your fingers, then pull it out and let it drip for 10 seconds or so until the wax dries.
Place it on the parchment paper and move on to your next piece. Pick it up by the part that’s already been waxed, and dip the uncoated part, holding it up for 10 seconds or so just like you did the first side.
Repeat this process so that the cheese has two coats. Make sure that you get all of the little air bubbles or pin holes covered so that the cheese is completely covered.
2. Painting on Wax
The next method is exactly what it says – you paint the wax onto the cheese. Heat the wax the same way as above and lay your cheese out.
The main benefit of painting wax is that you can cover any size piece of cheese that you want. After you’ve coated the first side with the first layer of wax, flip it over and do the other side. Add two coats.
Now your cheese is ready to store, and you no longer have to worry about facing the end of civilization as we know it without cheese.
There are so many things you can learn from our ancestors about preserving your food for survival. Watch the video below and discover how to keep your loved ones well fed when SHTF!
This article has been written by Theresa Crouse for Survivopedia.
CHECK OUR survival and prepping solutions
If you found this article useful, please like our Facebook page and stay up to date with the latest articles.
WHAT TO READ NEXT:
HOW TO MAKE YOUR OWN BACON (STEP BY STEP GUIDE)
A RETURN TO THE OLD PATHS: HOW TO MAKE PEMMICAN LIKE THE NATIVE AMERICANS
20 LOST RECIPES FROM THE PIONEERS: WHAT THEY COOKED IN THEIR JOURNEY WESTWARD
SEVEN CLASSIC GREAT DEPRESSION ERA RECIPES GRANDMA USED TO MAKE
POTTED MEAT: A LOST SKILL OF LONG TERM MEAT STORAGE
BACK TO BASICS: HOW TO MAKE AND PRESERVE LARD
THE BEST WAY TO STOCKPILE VEGETABLES OFF-GRID
OLD FASHIONED PRESERVING-GRANDPA’S RECIPE FOR CURED SMOKED HAM
HOW TO MAKE GUNPOWDER THE OLD FASHIONED WAY
SURVIVAL HERBAL RECIPES FROM OUR ANCESTORS
HOW TO PRESERVE MEAT FOR SURVIVAL LIKE OUR GRANDFATHERS
OTHER USEFUL RESOURCES:
The 3 Pioneer Survival Lessons We Should Learn
The Most Effective Home Defense Strategies
Old School Hacks for Off-Grid Living
The Medical Emergency Crash Course
The Smart, Easy Way to Food Independence
How to Survive the Coming 100 Years Long Drought
About Theresa Crouse
Theresa Crouse is a full-time writer currently living in central Florida. She was born and raised in the hills of West Virginia, where she learned to farm, hunt, fish, and live off the land from an early age. She prefers to live off the grid as much as possible and does her best to follow the “leave nothing behind but footprints” philosophy. For fun, she enjoys shooting, kayaking, tinkering on her car and motorcycle, and just about anything else that involves water, going fast, or the outdoors. You can send Theresa a message at editor [at] survivopedia.com.

